
Appearance
Study Metadata Comparison
Where to find it: Reports button → NeoDash → "Study Metadata Comparison" in the Report navigation panel.
Purpose
Compare metadata content between two specific studies, or between two versions of the same study, across six areas of the study specification.
If you need to know who performed a change on the study metadata then use the Audit Trail Report - Tab: Study Audit Trail by Date and Audit Trail Report - Tab: Study Audit Trail by Version
Concept & definitions
Base study vs Compare study — the two studies/versions being compared. Base is the baseline; Compare is what it is held up against.
Differences Only — a Yes/No toggle on the Select studies tab controlling whether similarities are shown alongside differences. On the value tabs (Study Fields, Objectives/Endpoints, Criteria, Planned Visits) it removes the identical rows; on the Collections and Activities tabs — which classify every row as added/deleted/moved/replaced/no change — it filters out the No Change rows.
Row colour coding — the six comparison tabs colour their rows, but they do not all use the same scheme. (The ReadMe and Select studies tabs are not colour-coded at all.) There are two groups:
Value tabs — Study Fields, Objectives/Endpoints and Criteria use two colours and have no legend card on screen:
Colour Meaning 🟩 Green Base and Compare hold the same value 🟥 Red The values differ — including a value present on one side only (blank cell on the other) Change-type tabs — Planned Visits, Collections and Activities classify each row and show a Change Type legend card in the top-left corner of the tab. Each tab has its own set of change types:
Change Type Planned Visits Collections Activities 🟦 Added — exists on one side only ✔ ✔ ✔ 🟩 No Change — same on both sides ✔ ✔ ✔ 🟥 Deleted — exists on the other side only ✔ ✔ ✔ 🟧 Changed — present in both, different value ✔ — — 🟧 Moved — same item, different place in the SoA hierarchy — — ✔ 🟪 Replaced — substituted by another item — ✔ ✔ Note that orange means Changed on Planned Visits but Moved on Activities, and that only Collections and Activities have Replaced. Read the legend card on the tab you are on rather than assuming it carries over.
NOTE
Added and Deleted are relative to the direction of the comparison, which depends on which study/version you picked as Base and which as Compare — selecting the newer version as Base inverts the reading. Use the empty cell to tell you where the item is missing rather than relying on the word alone.
Current Study Selection — a card repeated at the top of every comparison tab that echoes the chosen Base/Compare pair, so you always know what is being compared.
IMPORTANT
Prerequisites: comparing two versions of the same study requires that study to have been locked at least once. A draft-only study has a single version, so the Select studies tab offers only one row for it and there is nothing to compare it against. Lock the study, or compare it against a different study instead.
In addition to the ReadMe tab, the report includes a tab for study selection, followed by six sections, each displaying the differences within an area of the study specification.
When to use
Use when you need to see what differs between two studies or two versions of a study — fields, objectives/endpoints, criteria, visits, collections, activities.
Report tabs
The report is organised in different tabs, each supporting a different purpose. To open the report, see Open NeoDash on the section landing page.
| Tab | Use it to… |
|---|---|
| ReadMe | Get oriented on the comparison report and how the tabs are organised. Start here. |
| Select studies | Set Differences-only, optionally filter by project, then pick the Base and Compare studies/versions. |
| Study Fields | Compare simple study selections and values — study title, registry identifiers, study properties, study criteria. |
| Objectives/Endpoints | Compare objectives and the related endpoints. |
| Criteria | Compare inclusion, exclusion, run-in, randomisation, dosing and withdrawal criteria. |
| Planned Visits | Compare visits and the individual visit attributes. |
| Collections | Compare the planned collections — the 'X's in the schedule of activity (SoA). |
| Activities | Compare the selected activities for the SoA and how they are organised within the SoA. |
NOTE
The screenshots in this guide use Base CDISC DEV-0 version 8 (2026-04-14, LOCKED) compared with CDISC DEV-0 version 2 (2024-12-16, LOCKED) — a within-study version comparison — with Differences only = No, so both differences and similarities are shown.
ReadMe
Purpose: Orients you to how the comparison report is structured and how its tabs work together.
When to use: Open this tab first, before selecting studies, to understand how the report is organised.
Show Quick Guide
- Open the ReadMe tab.
- Review how the report is organised before selecting studies.
The ReadMe explains that you compare either two different studies or two versions of the same study, that you begin on the Select studies tab, and that the first panel on that tab controls whether only differences (Yes) or all content (No, the default) is shown.
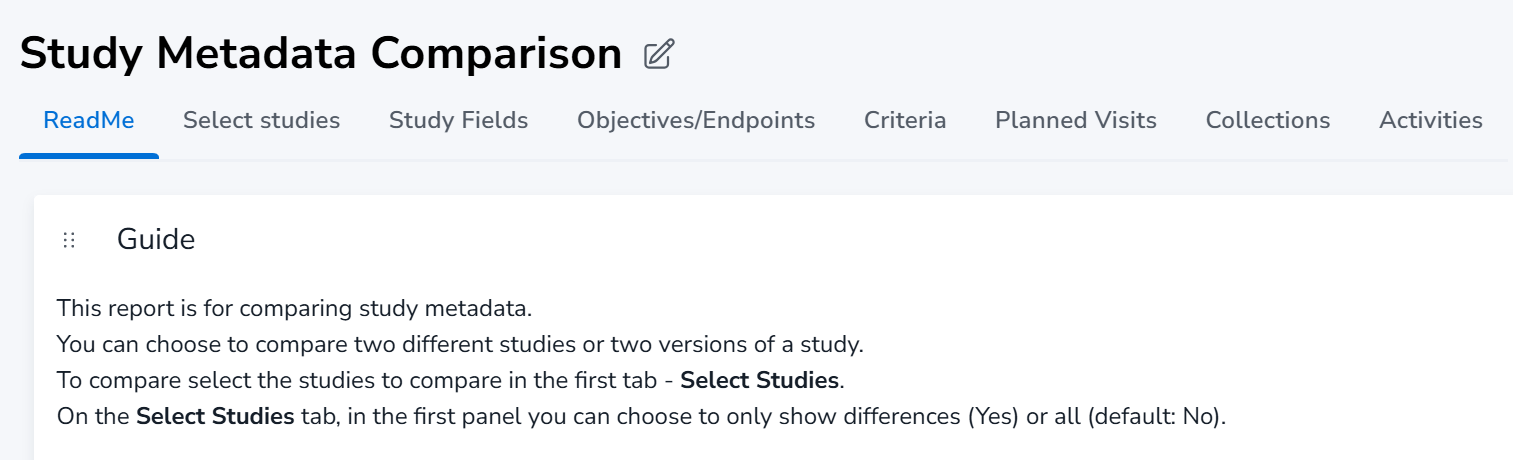
In addition to the ReadMe tab, the report includes a tab for study selection, followed by six sections, each displaying the differences within an area of the study specification.
The following six tabs display the compare result for:
- Study Fields which provides comparison of simple study selections and values from study title, registry identifiers, study properties, study criteria.
- Objectives/Endpoints which compares objectives and the related endpoints.
- Criteria which compares inclusion, exclusion, run-in, randomisation, dosing and withdrawal criteria.
- Planned Visits which compares visits and the individual visit attributes.
- Collections which compares the planned collections, the 'X's in the schedule of activity (SoA).
- Activities which compares the selected activities for the SoA and how they are organised within the SoA.
Select studies
Purpose: Lets you set the Differences-only toggle and pick the Base and Compare studies or versions to compare.
When to use: Use before opening any comparison tab, to choose which two studies or versions you want to compare.
Show Quick Guide
- Set Differences only (A) and optionally narrow the study lists with Select Project(s) (B).
- Click BASE (C) on the row for the study/version to use as the baseline.
- Click COMPARE (D) on the row for the study/version to compare against it.
- Check the Selected Studies card (E), then move on to a comparison tab.
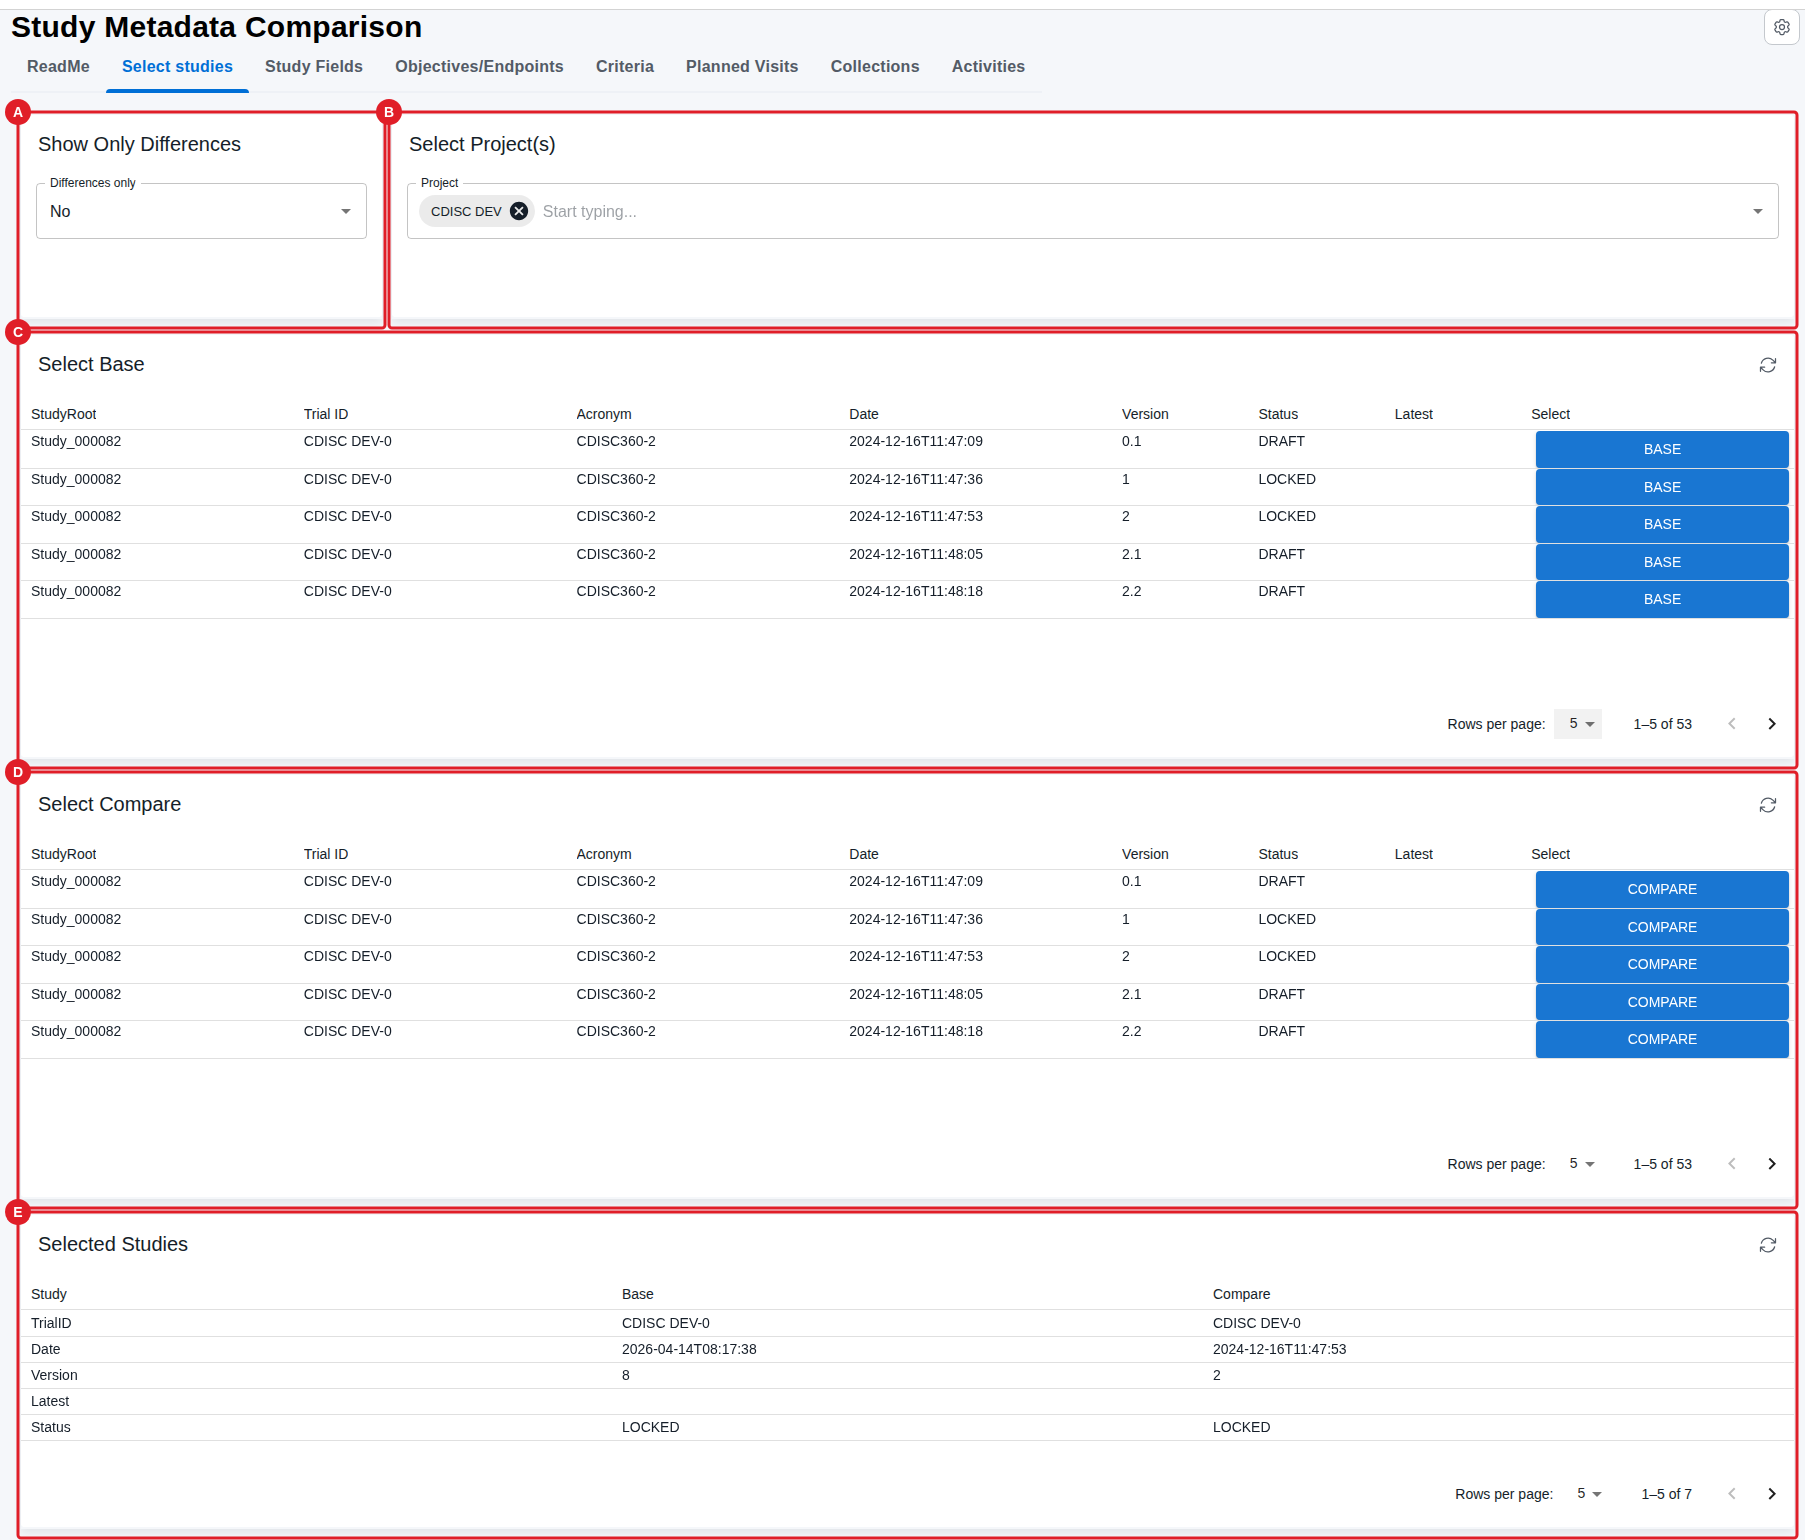
- Show Only Differences (A) — set Differences only to Yes to list only differences, or No to include similarities as well. The default is No, so similarities are shown until you change it. This applies to the Study Fields, Objectives/Endpoints, Criteria and Planned Visits tabs; on the Collections and Activities tabs the No Change rows are filtered out when Yes is chosen.
- Select Project(s) (B) — filter the study lists by one or more projects (multi-select) to make the two studies easier to find. In the example the list is narrowed to project CDISC DEV.
- Select Base (C) — the table lists each study version with its StudyRoot, Trial ID, Acronym, Date, Version and Status (DRAFT or LOCKED). Click BASE on the row you want as the baseline.
- Select Compare (D) — the same list repeated; click COMPARE on the row to compare against the Base. Picking two rows of the same study compares two versions; picking rows of two different studies compares the studies.
- Selected Studies (E) — confirms the current selection (TrialID, date, version, latest and status for both sides). This card is repeated as Current Study Selection at the top of every comparison tab.
NOTE
Both tables show 5 rows per page by default — use Rows per page and the page arrows to reach the version you need (the example list holds 53 rows).
NOTE
See Prerequisites above for the version-lock requirement when comparing two versions of the same study.
TIP
It is also possible to compare two different studies.
Study Fields
Purpose: Compares simple study selections and values, such as study title, registry identifiers and study properties.
When to use: Use when you need to check whether basic study field values differ between the two selected studies or versions.
Show Quick Guide
- Open the Study Fields tab and confirm the pair in Current Study Selection (A).
- Read Study Field Comparison (B) — each row is one study field with its Base and Compare value.
- Use the Study Field column menu to filter down to a single field, or Rows per page to see more at once.
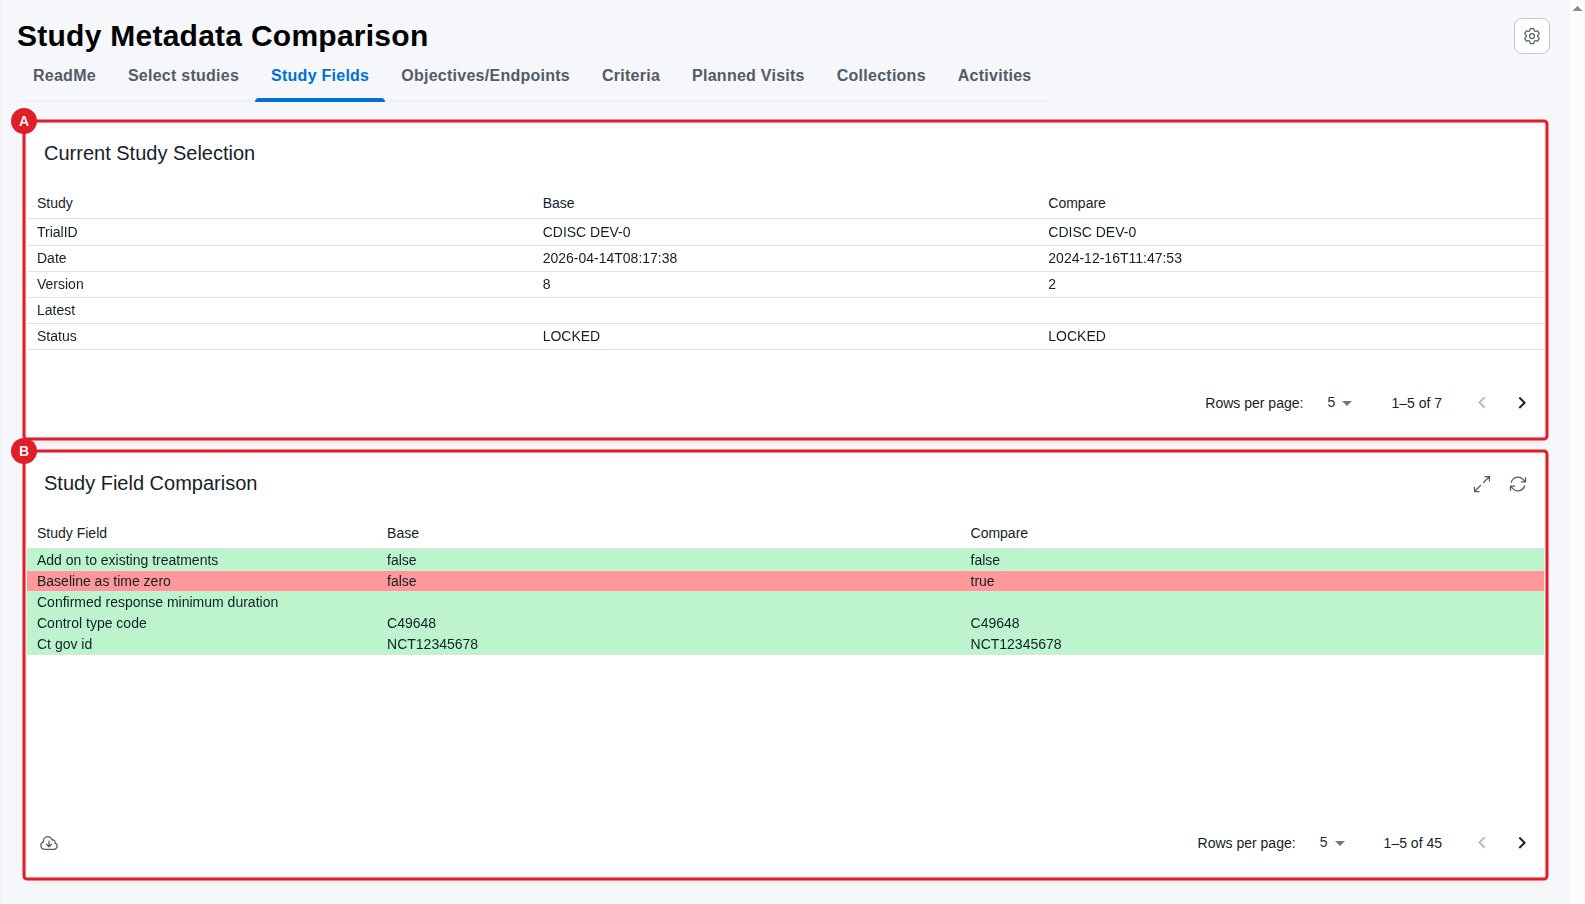
- Current Study Selection (A) — the Base/Compare pair carried over from the Select studies tab.
- Study Field Comparison (B) — one row per study field. 🟩 Green rows are identical in both; 🟥 red rows differ. In the example Baseline as time zero is red because Base has
falseand Compare hastrue, while Control type code (C49648) and Ct gov id (NCT12345678) are green because both sides match. A blank value on one side means the field is set in only one of the two studies.
To hide the identical (green) rows, set Differences only to Yes on the Select studies tab.
Objectives/Endpoints
Purpose: Compares the wording of study objectives and their related endpoints.
When to use: Use when you need to see whether objectives or endpoints have changed between the two studies or versions.
Show Quick Guide
- Open the Objectives/Endpoints tab and confirm the pair in Current Study Selection.
- Read Objectives (A) — the Base and Compare objective wording, numbered Obj 1, Obj 2, …
- Read Endpoints (by Objective) (B) — each endpoint under its objective, with a Diff flag.
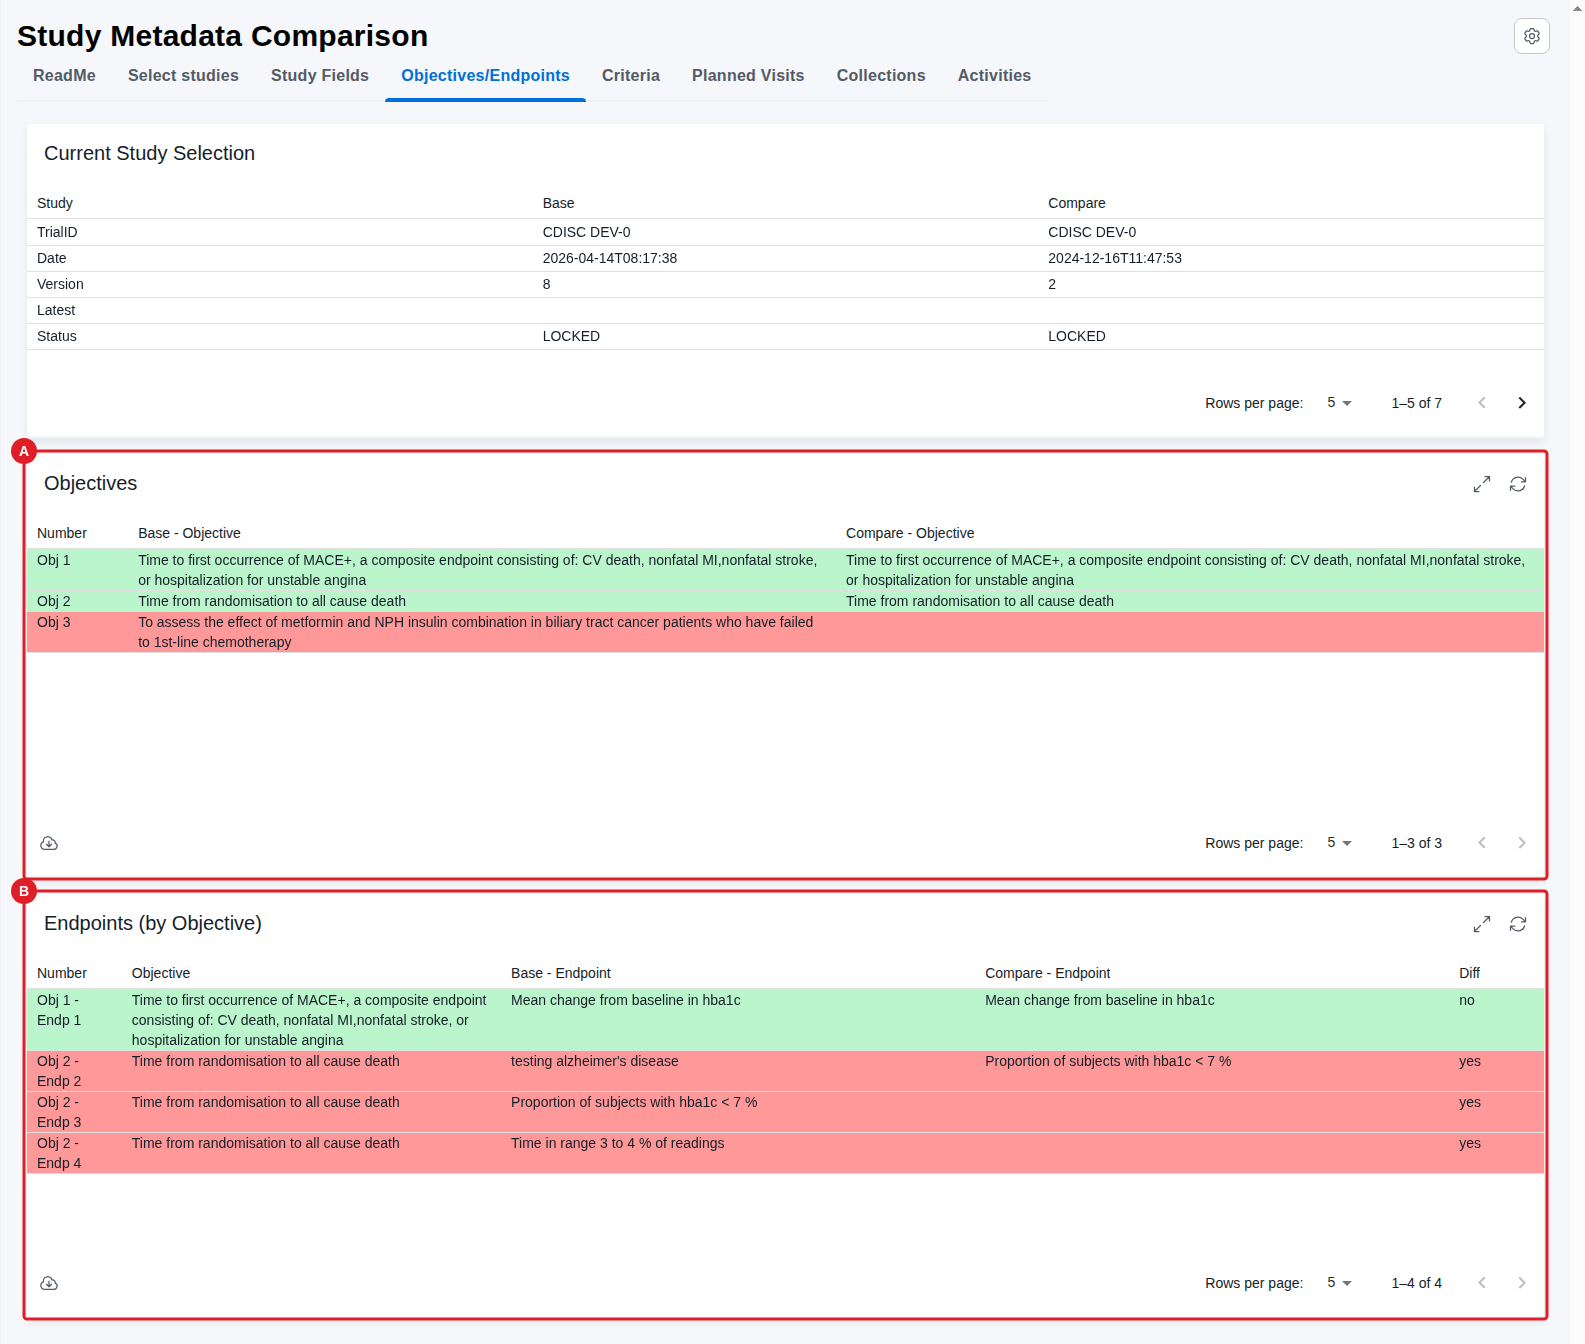
- Objectives (A) — Number, Base - Objective and Compare - Objective. 🟩 Green rows have identical wording on both sides; 🟥 red rows differ. In the example Obj 3 is red with an empty Compare cell — the objective exists in the Base version only.
- Endpoints (by Objective) (B) — each row is an endpoint (Obj 2 - Endp 3) with its parent Objective, the Base - Endpoint and Compare - Endpoint text, and a Diff flag of
yes/no. The Diff column is the quickest way to scan the table; the row colour repeats the same information.
To hide identical rows, set Differences only to Yes on the Select studies tab.
Criteria
Purpose: Compares inclusion, exclusion, run-in, randomisation, dosing and withdrawal criteria.
When to use: Use when you need to check whether eligibility or study criteria differ between the two studies or versions.
Show Quick Guide
- Open the Criteria tab and confirm the pair in Current Study Selection.
- Read Study Criteria (A) — rows grouped by Category with Base and Compare criterion text side by side.
- Filter the Category column to focus on one criterion type.
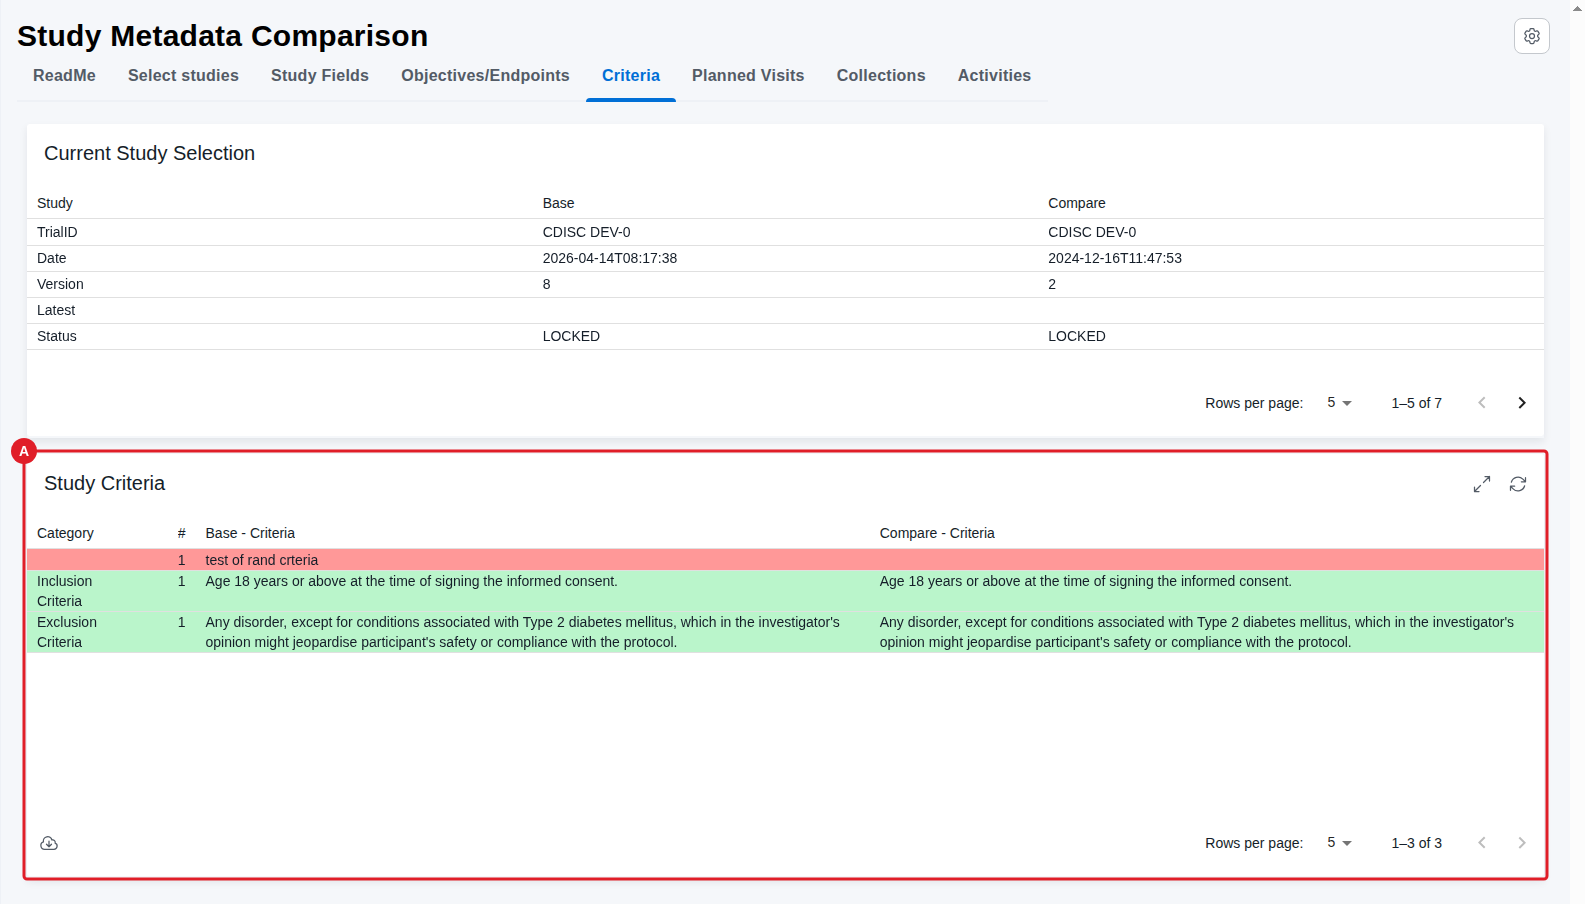
- Study Criteria (A) — Category (Inclusion Criteria, Exclusion Criteria, and the other criterion types: run-in, randomisation, dosing and withdrawal), a running # within the category, and the Base - Criteria / Compare - Criteria text. 🟩 Green rows are identical in both studies; 🟥 red rows differ.
A blank cell in the Base or Compare column means the criterion exists in only one of the two studies — in the example the red row ("test of rand crteria", with no Category set) exists in the Base version only. Set Differences only to No on the Select studies tab to include criteria that are identical in both.
Planned Visits
Purpose: Compares planned visits and their individual attributes, such as timing and naming.
When to use: Use when you need to check whether visit definitions or their attributes have changed between the two studies or versions.
Show Quick Guide
- Open the Planned Visits tab and read the Change Type legend (A).
- Confirm the pair in Current Study Selection.
- Read Visit Attribute Changes (B) — one row per visit attribute, with its Base and Compare value.
- Filter the Visit Property Type column to focus on a single attribute across all visits.
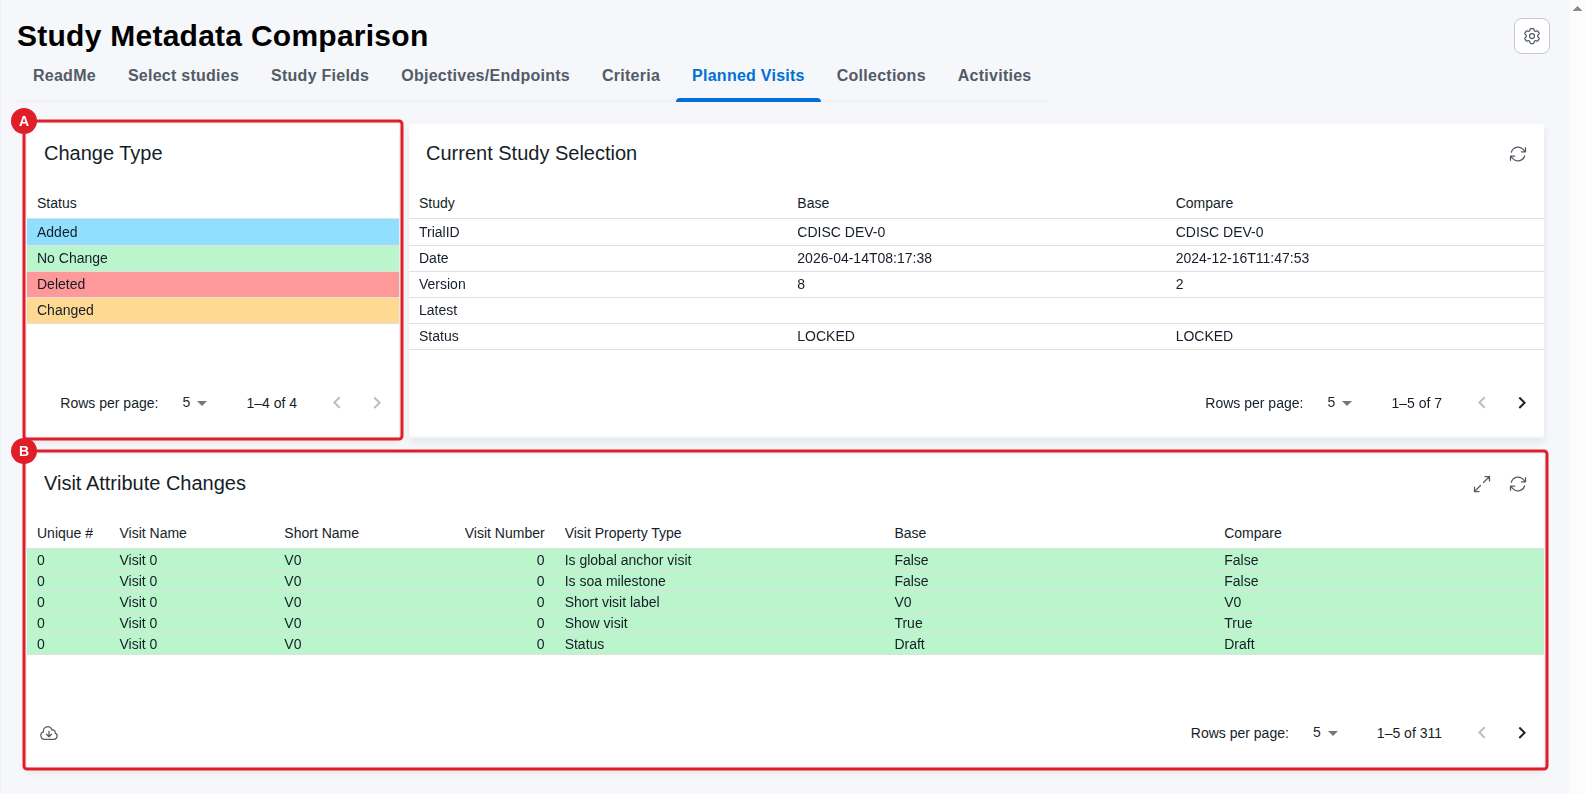
- Change Type (A) — the legend for this tab: 🟦 Added, 🟩 No Change, 🟥 Deleted, 🟧 Changed.
- Visit Attribute Changes (B) — one row per visit and attribute, so a single visit contributes many rows. Columns are Unique #, Visit Name, Short Name, Visit Number, Visit Property Type (the attribute, for example Is global anchor visit, Is soa milestone, Short visit label, Show visit, Status, TimePoint), and the Base / Compare values.
Because every visit contributes one row per attribute, this table is long — the example holds 311 rows with Differences only = No. Two ways to make it workable:
- Set Differences only to Yes on the Select studies tab to drop the 🟩 No Change rows.
- Maximize the card and Filter the Visit Property Type column to a single attribute — for example TimePoint to compare visit timing across the two versions.
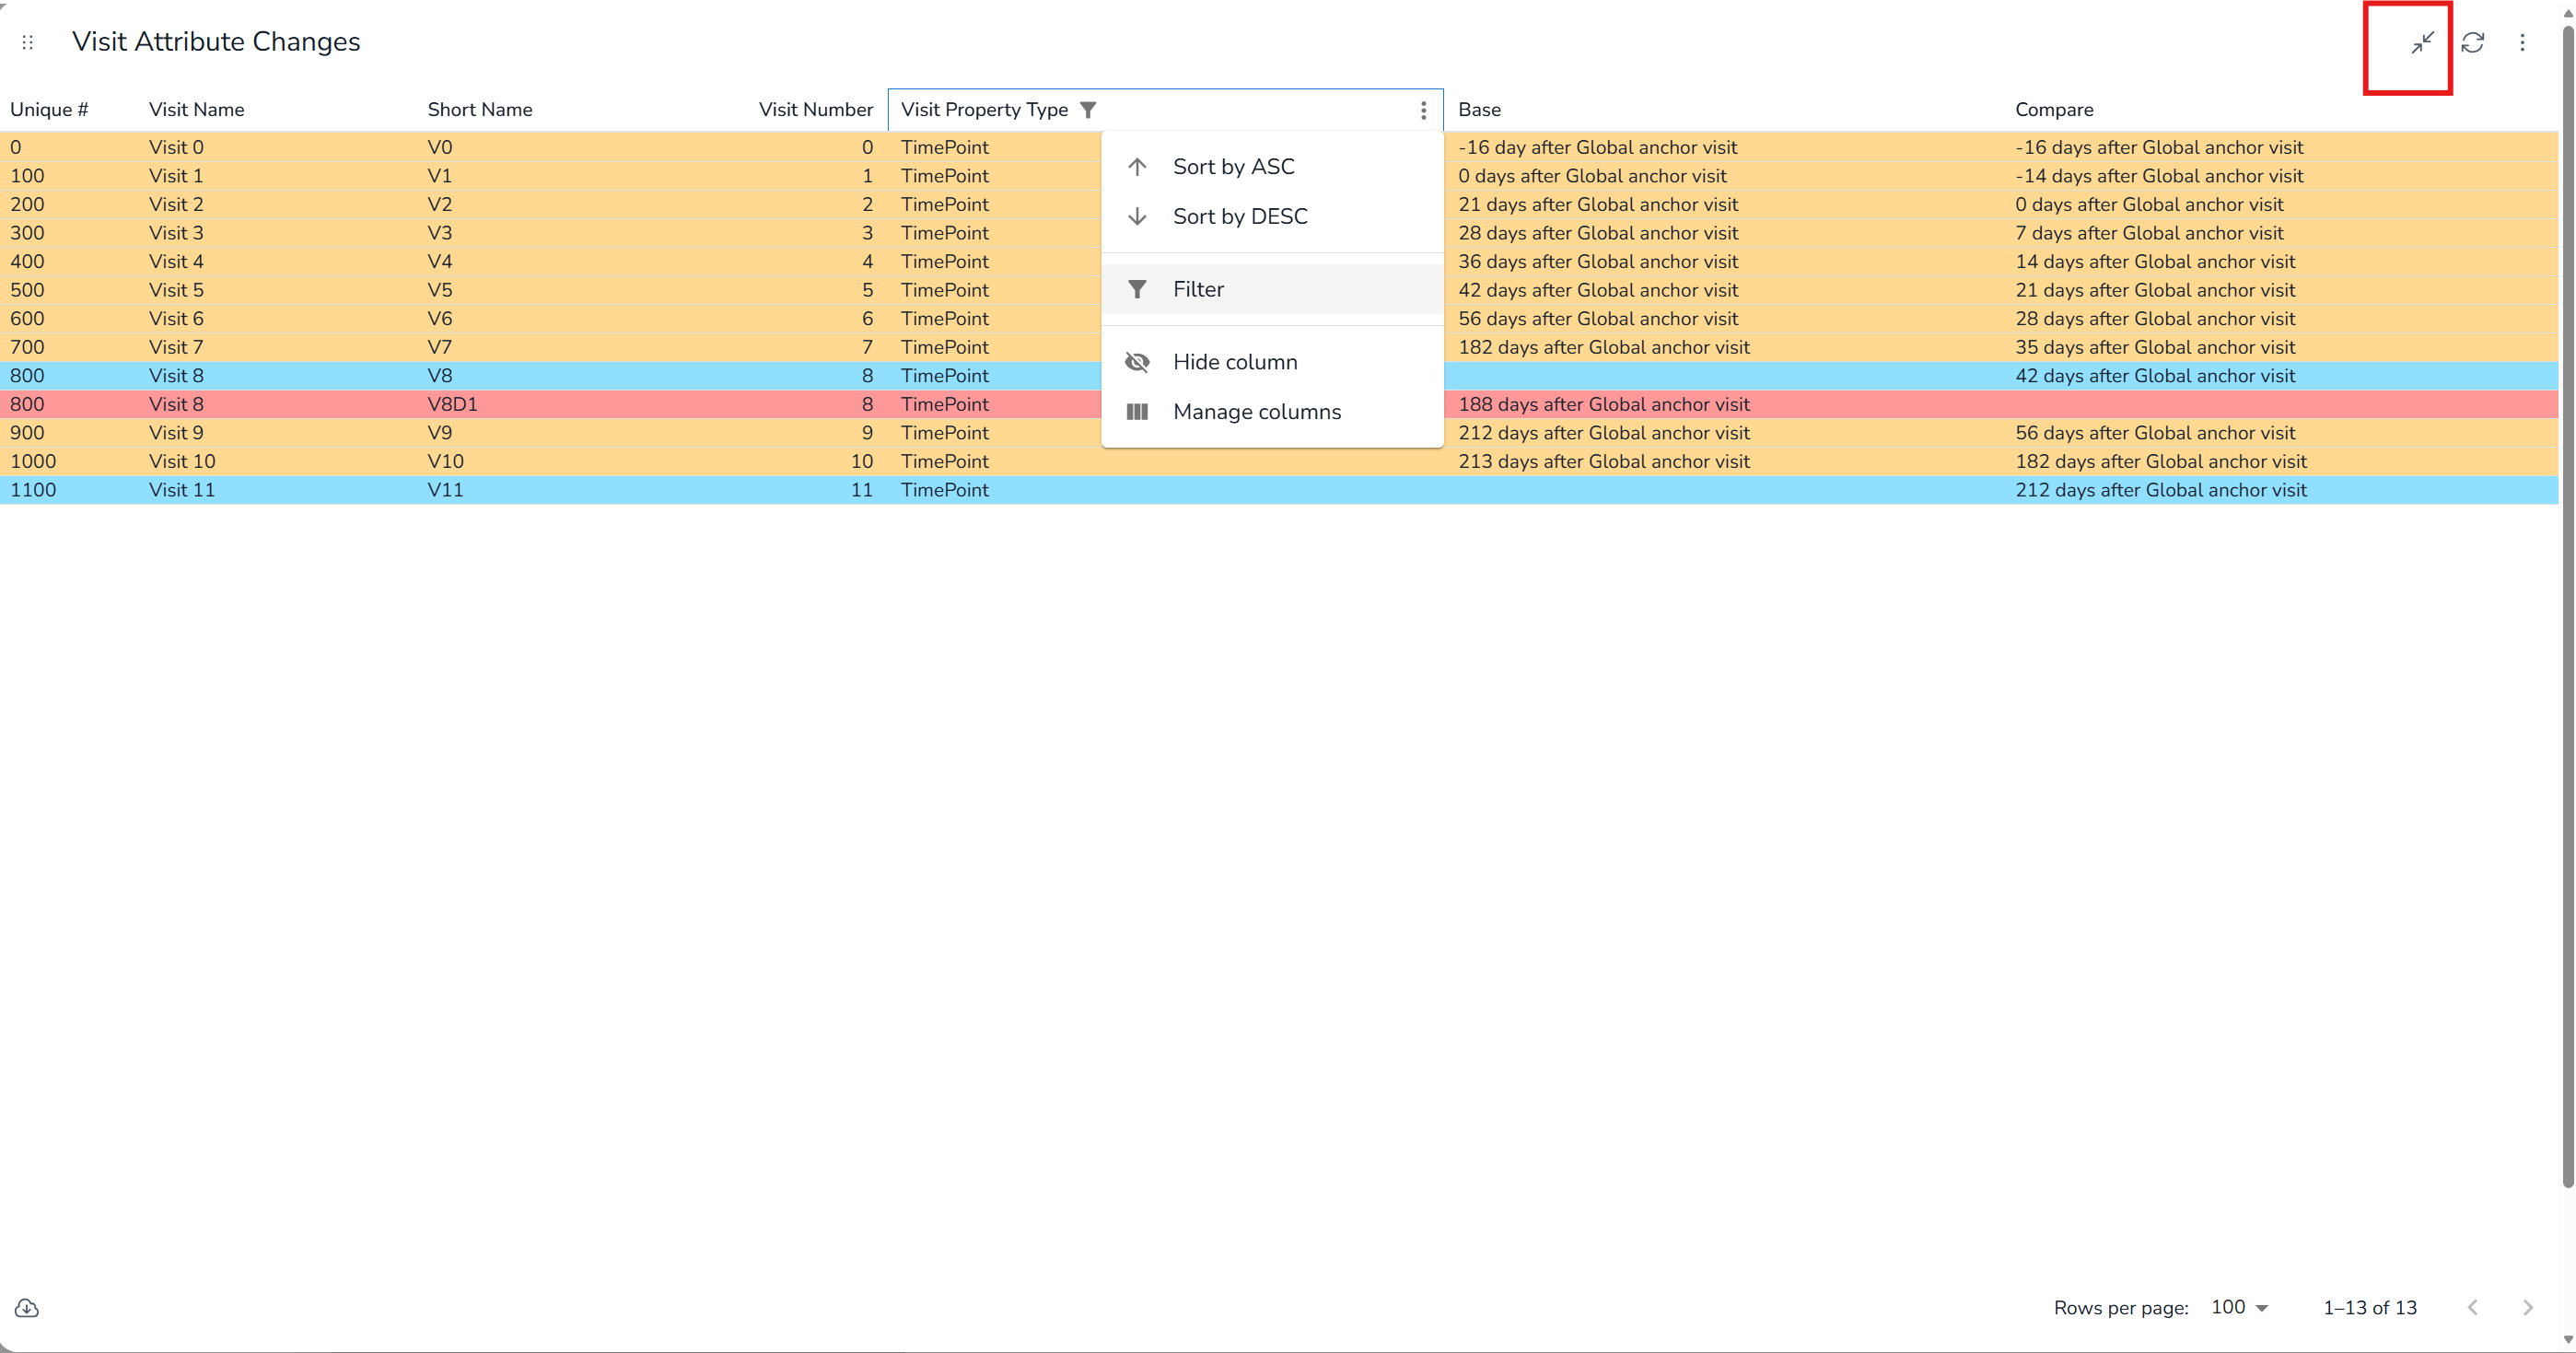
In this maximised, TimePoint-filtered view the change types are easy to read: 🟧 orange rows are visits whose timing moved (Visit 1 went from 0 days to -14 days after Global anchor visit), 🟦 blue rows are visits added in the Compare version (Visit 8 / V8, Visit 11 / V11), and the 🟥 red row is a visit present in the Base version only (V8D1).
Collections
Purpose: Compares which activities are planned for collection at each visit — the 'X's in the schedule of activity (SoA).
When to use: Use when you need to see which activity collections were added, deleted or replaced between the two studies or versions.
Show Quick Guide
- Open the Collections tab and read the Change Type legend (A).
- Confirm the pair in Current Study Selection.
- Read Planned Collections at Visits (B) — one row per activity at a visit, with its Base and Compare collection and the resulting Change Type.
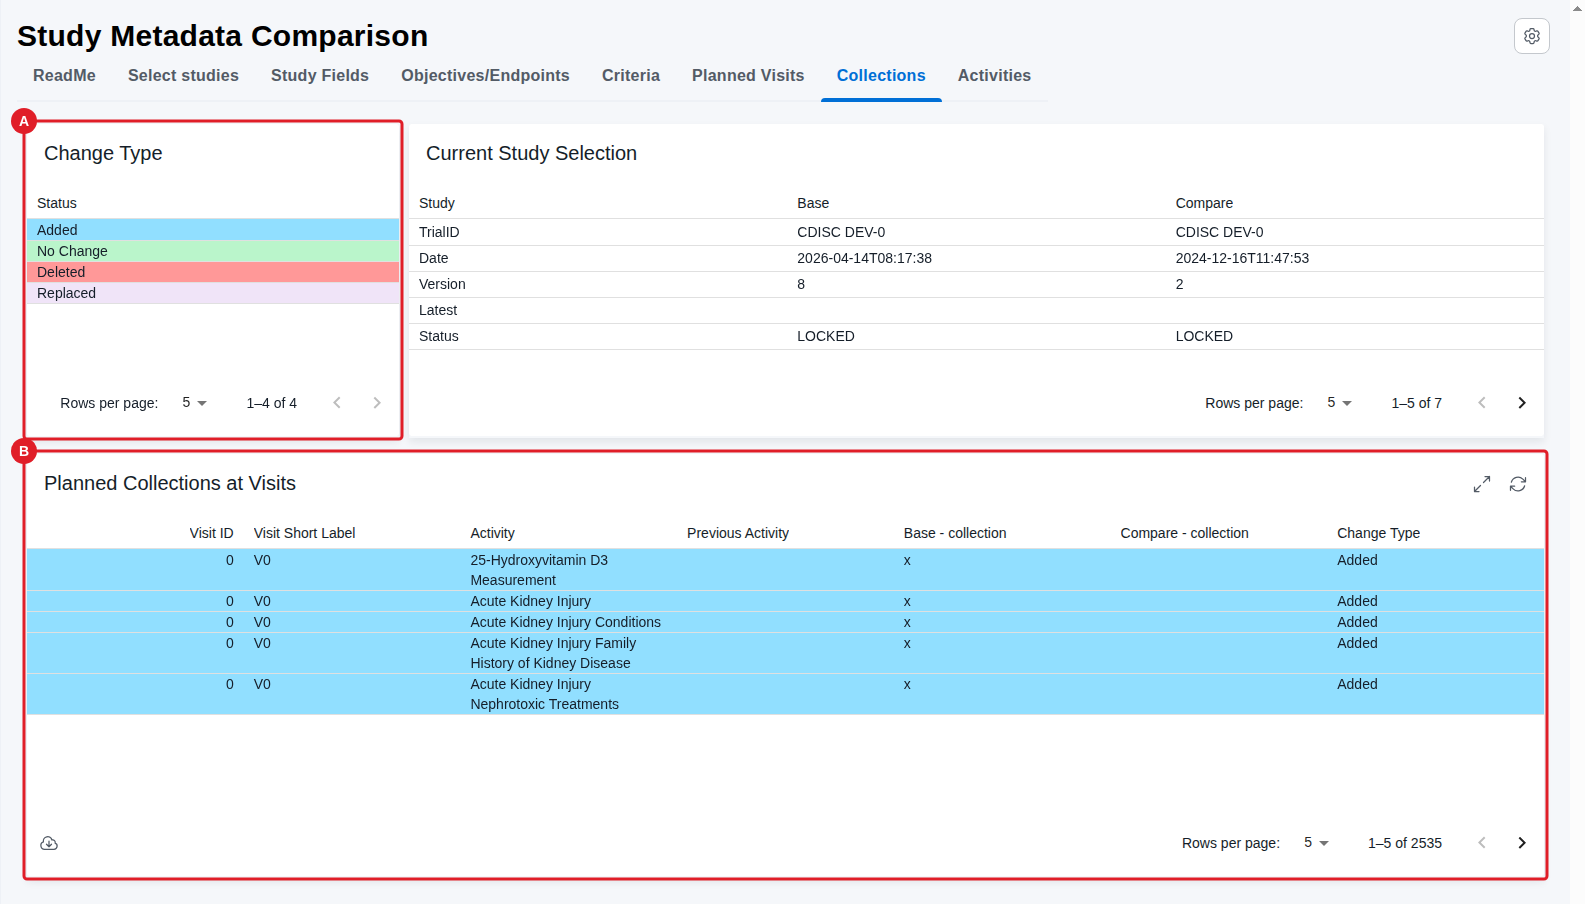
- Change Type (A) — the legend for this tab: 🟦 Added, 🟩 No Change, 🟥 Deleted, 🟪 Replaced.
- Planned Collections at Visits (B) — columns are Visit ID, Visit Short Label, Activity, Previous Activity, Base - collection, Compare - collection and Change Type. The two collection columns hold the from the SoA and Base is to be regarded as the current or anchor of the comparison. So, in the example version 8 is the selected Base and it is being compared against Compare version 2. In this example an
xin Base means the collection was Added. If we had changed the selection and version 2 was the Base and Compare was vesion 8 then anxin Compare means Deleted. Ifxin both means No Change. Previous Activity is filled when an activity was Replaced by another, so you can see what it superseded.
In the example all visible rows are 🟦 Added — the activities at visit V0 (25-Hydroxyvitamin D3 Measurement, Acute Kidney Injury, …) carry an x in Base but not in Compare, i.e. these collections were introduced between the two versions.
TIP
This table is the largest in the report (2535 rows in the example). Use Differences only = Yes on the Select studies tab to filter the No Change rows out, and filter the Visit Short Label or Change Type column to narrow further.
Activities
Purpose: Compares the selected SoA activities and their placement within the SoA hierarchy.
When to use: Use when you need to check whether activities were added, deleted, replaced or moved within the SoA hierarchy between the two studies or versions.
Show Quick Guide
- Open the Activities tab and read the Change Type legend (A).
- Confirm the pair in Current Study Selection.
- Read Detailed Flowchart Compare Between Base and Compare Study (B) — each activity with its Base and Compare position in the SoA hierarchy.
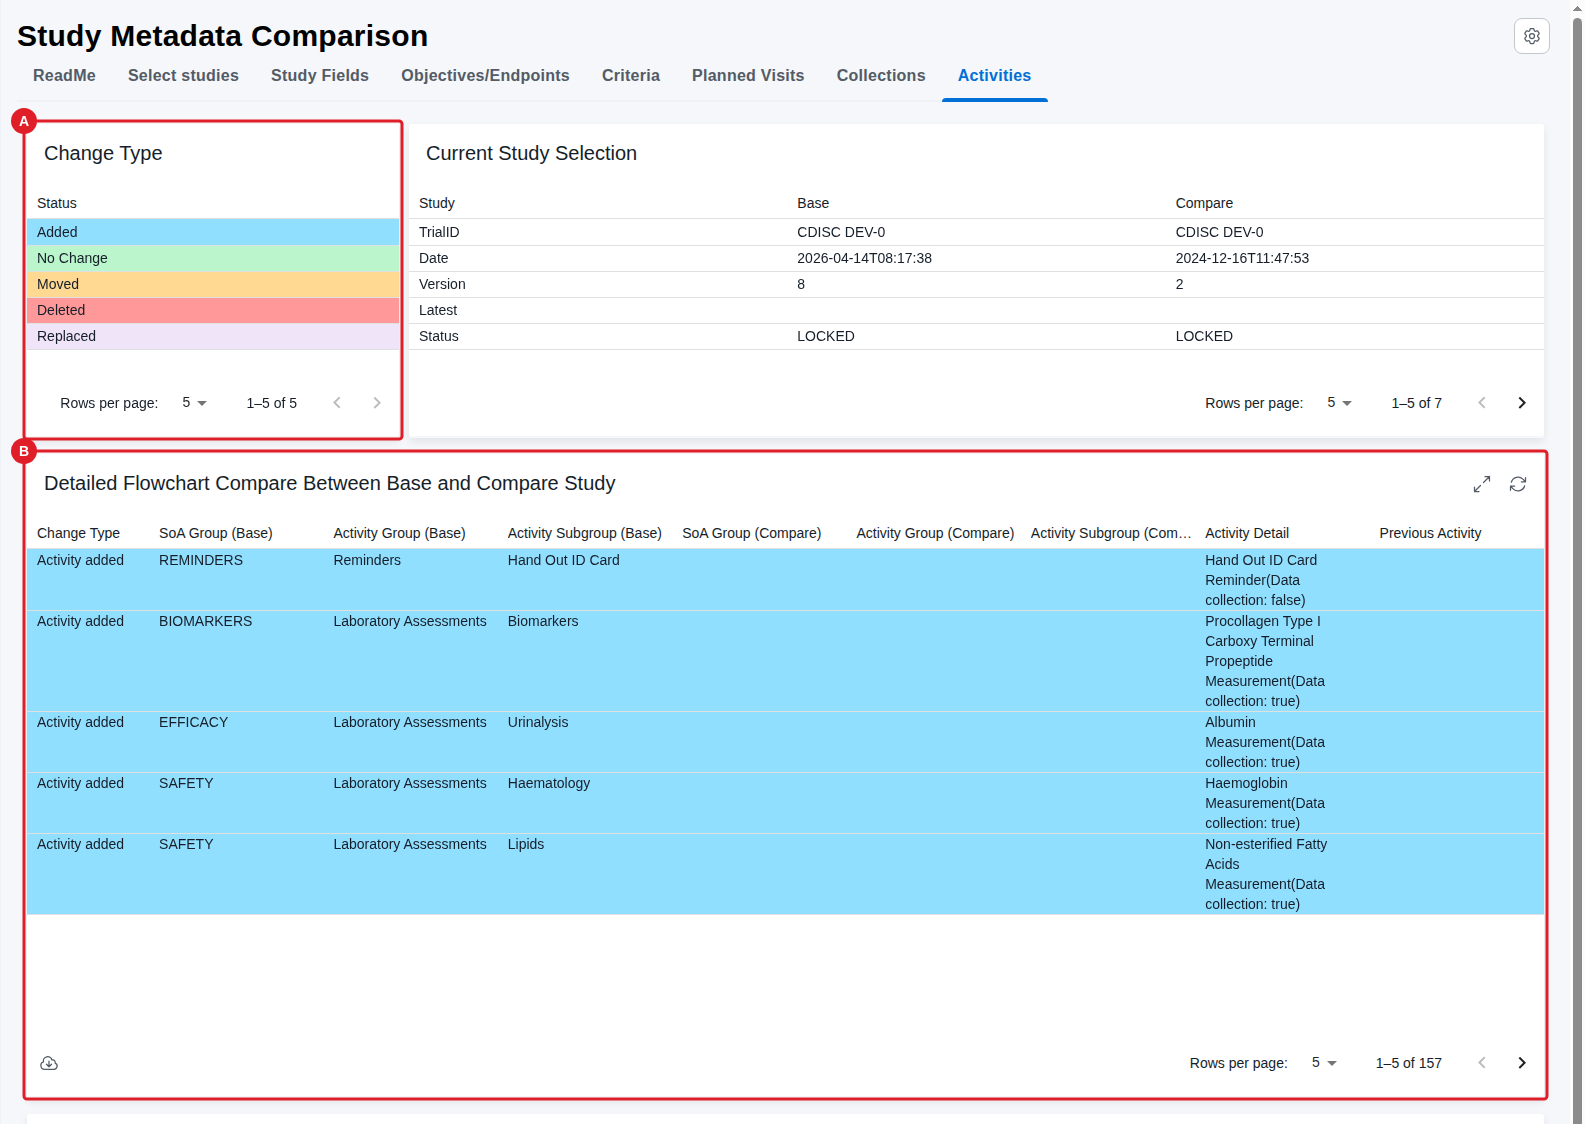
- Change Type (A) — the legend for this tab: 🟦 Added, 🟩 No Change, 🟧 Moved, 🟥 Deleted, 🟪 Replaced.
- Detailed Flowchart Compare Between Base and Compare Study (B) — each row is one activity, with its placement on both sides: SoA Group (Base) / Activity Group (Base) / Activity Subgroup (Base) against SoA Group (Compare) / Activity Group (Compare) / Activity Subgroup (Compare), plus Activity Detail (the activity instance and its
Data collectionflag) and Previous Activity.
Reading the two triples side by side is what makes a Moved activity visible: the activity exists on both sides but under a different SoA group, activity group or subgroup. In the example every visible row is 🟦 Activity added — the Base columns are populated (REMINDERS / Reminders / Hand Out ID Card, BIOMARKERS / Laboratory Assessments / Biomarkers, …) while the Compare columns are empty, so these activities were introduced between the two versions.
TIP
The example table holds 157 rows. Set Differences only to Yes on the Select studies tab to filter the No Change rows out, or filter the Change Type column to see only the moves.
Show Solution Architecture
The comparison runs over two selected study versions or two different studies. NeoDash has limitations in terms of dynamic column displays — only predefined columns are allowed, which is why each tab has a fixed Base/Compare column pair rather than a column per version.
Common errors
| Symptom | Interpretation | Likely cause | Fix |
|---|---|---|---|
| Comparison tabs are empty or show every row as a difference | A selection step was skipped, not a report fault | Only a Base was selected (no valid Compare), or the two studies have no overlapping metadata | On the Select studies tab, confirm the Selected Studies card shows a Base and a Compare with two different versions/studies |
| Similarities are not shown | Expected — a display setting, not missing data | Differences only is set to Yes | Set Differences only to No on the Select studies tab |
| The study you want is not in the Base/Compare list | Filtered out, not absent from the database | A project filter is applied, or the study is on a later page | Clear Select Project(s), or raise Rows per page and page through the list |
| Only one version row is offered for a study | Expected — see Prerequisites above | The study has never been locked, so it has a single version | Compare against a different study, or lock the study to create a version |
| A comparison table is unusably long | Expected — every attribute contributes its own row | Every visit attribute / activity at every visit produces a row | Set Differences only to Yes, Maximize the card, and filter a column (for example Visit Property Type or Change Type) |
| Row colours are not self-explanatory | A design limitation, not missing information | The value tabs have no legend card — only Planned Visits, Collections and Activities do | See Concept & definitions above for the full colour key |
If this does not resolve the issue, contact your OpenStudyBuilder administrator.